WordPress is a powerful program that is simple to use. It is that way because many people have put years into refining it to be so. Millions of people use it, and there are endless resources to help you learn more and do more with it. It was designed as a blogging platform and has grown to serve as a multi-faceted content management system for seemingly endless possibilities.
This is a simple WordPress user’s guide for beginners, designed to guide a new user through the basics of adding and editing content in a pre-installed WordPress environment. Whether you are using this as a blogging platform or as a content management system, this guide should serve the beginner well. This user guide is written at a time when the current version of WordPress is version 2.9.
Side Note: Whether you are a web designer or developer using this guide to support your clients, or a first time user of WordPress, feel free to let me know how I can improve this guide – by submitting comments below. It is not intended to be exhaustive, just the basics. And please be patient and check back for updates.
Video Resources: In September of 2011 I created a series of video tutorials and uploaded them to YouTube – you can find them here: WordPress Video Tutorials
Lets get started.
What you need
- The URL address (website address) to login to your admin panel. (It will likely end in: /wp-admin or /wp-login.php).
- Your username and password.
Guide Topics – many coming soon
- Overview – Dashboard and Core Navigation
- Posts & Pages Overview
- Create a New Post or Page
- Add, Edit, and Format Text in a Post and Page
- How to Make an Email Address Link
- Add Images, Video, Audio and other Media
- Edit Images, Video, Audio and other Media
- How to Update and Backup your WordPress Website
Overview – Dashboard & Core Navigation
When you first login to your WordPress Admin panel, your “Dashboard” will look something like this (depending on your color choice and WP version):

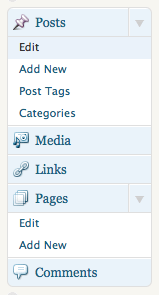
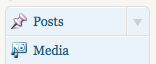 There is a list of main navigation topics down the left side, (Posts, Media, Links, Pages, etc.) that remain constantly on every page of your WP admin panel. The rest of the Dashboard will display general information about your blog (Right Now, Recent Comments, etc.) and about WordPress (WordPress Development Blog, Other WordPress News). Each of the core navigation topics and each of the Dashboard topics can be expanded or contracted to show or hide its content. To do so, click on the far right side of any topic, (an expand arrow appears when you move your cursor over the right side – see detail image at right).
In the example image above, all topics are closed except the QuickPress window, which has been expanded.
Notice at the top right there is a “Help” link. This will also be available on every page in your administration panel. To return to this Dashboard view at any time, click on the Dashboard button at top left of your screen, shown above.
Posts and Pages Overview
 Most of the content on your website that comes from your WordPress program was entered as either a “post” or as a “page”. I say “most” because your website might not all be controlled by your WordPress installation, and even within WordPress, you may have some content, such as a post author biography, that was not entered as a post or as a page. For most part though, you will be working with posts and pages.
Posts refer to content that is displayed in a blog format. That is, most often, your most recent post, (or a portion of it), is displayed at the top of whatever page is designated to display them, with the next most recent post below it, and so on. This way, every time you add content to your site as a post, it is automatically added to the top of your “posts” page, most often the front page of your blog, where visitors can easily see what you have written most recently. And your posts can also be found on your website by using a search tool, if there is one, or by clicking on one of a number of “categories” by which you will have organized and cataloged your posts. So even when time has moved a post far from your front page, people can find them, on your site, or even from a search engine that has found your post popular.
Pages on the other hand are not affected by the other content you write on your website. You create a page and there it stays, just like it is, unchanging, for everyone to view just as you intended it to be. You can edit pages just as easily as you can edit posts, but the content is not presented in a chronological order, or by category, or any other way other than exactly as you entered it. You want to use a page to present information “About Us”, or “About our Company”, or about “Our Products” or “Our Services”, or for people to “Contact” you, then a page is what you want.

17 thoughts on “A Simple WordPress User Guide for Beginners 2.9”
Hi David
I am new to wordpress and while I am finding it relatively easy to edit, I cant seem to change the section of my homepage where it says “Make a bold statement… grab your visitors attention……”.
For something like that you have to read the instructions for the specific theme you have, as something like that is theme specific.
Hi David,
Its the “Visual” is not shown in my edit page area. Only the HTML is shown. How do I get my Visual button to display again. I upgraded my WP to a upgraded version. Please tell me how to get the Visual back.
Thanks, David
In your admin area, go to Users>Your Profile and the first option is a tick box for the Visual Editor. Untick that box that says: “Disable the visual editor when writing”. Save your changes with the blue button at bottom of the page.
David, you are awesome!! Thank you my so much!! : )!!
Hi, I’m the church secretary at Cairn Christian Church. I’m in charge of updating our web page. I would like some free help on using filters.
I’m trying to put in a class that is recurring and meets on the 1st and 3rd Tuesday of the month.
I’m not sure which of your guide topics to look at to try and figure this out on my own.
Thanks! Linda Abel
Hi Linda,
This guide is specific to basics of WordPress. Your question is specific to an additional feature to WordPress, called a “plugin” {most likely}. If my guessing is correct, and you login to your website and on the left side where you have your navigation topics – go to Plugins. When you see the list of plugins, look for one with a name that matches what you are looking for – perhaps some sort of Calendar, (not sure exactly what you have, so maybe a scheduling one, or other).
When you find that plugin, there should be a link in blue under the description to its plugin page or the authors page – from there you can track down details on how that plugin works specifically.
Hope that helps.
i am also writing an admin manual for one of my clients who wanted me to develop a WP website. I’ll share it once i get it done.
Thanks for your post, its helping me in writing my guide.
Great. Let em know.
Pingback: Napa Web Designer's Blog » How to Make an Email Address Link
i am new to wordpress coming over from storyboard. i cannot find out to 1. increase text size and 2. to password protect a page. is this possible.?
thanks
bob dee
Hi Bob,
1. Note sure your angle on needing to increase text size. If you mean using the text editor in Edit Page or Edit Post admin screen, you can either use a header option, (header 1, header 2, header 3, etc.), or install a plugin like TinyMCE Advanced which will allow you to customize the text editor and add the ability to control font size. The other way is to change the CSS style sheet.
2. There is more than one way to password protect a page. One way is to use the “Visibility” function on your Edit Page or Edit Post admin screen to change the page or post to Password Protected or Private. You can read more details in the WordPress Codex here.
Good luck
Thanks for these very useful and easy to understand guides. I will be sending my clients to your site to learn how best to use their WordPress sites.
Glad you found it useful. I visited your website and liked your design work and choice for clients.
Thanks for putting together this useful guide. I was just trying to gather up some basic posting instructions for a client and your site was very helpful.
David,
Very informative! I look forward in using WordPress. I have one question though, what is better to use, WordPress.com or WordPress.org?
WordPress.com is for those who have or want their wordpress blog(s) hosted using wordpress.com’s free hosting service. In that case you would have a website at http://www.youruniquename.wordpress.com. There is a huge community of bloggers, something like 250,000 who have their blogs on wordpress.com. You can create a blog very easyilywith them and be up and running in no time. They have it set-up to make it easy for people – and best of all it is free. And there are some limitations as well, such as, you cannot install your own plugins if you want to extend your blogs functionality beyond the way it is configured. I suspect that is necessary to keep their platform stable.
WordPress.org provides information and resources for all users and interested parties with regard to Worpress. It is the home for WordPress. You can download the latest version to install yourself, find documentation on how to install yourself, and on how to customize or otherwise work with your wordpress blog. So the two sites have unique purposes and functions. It depends on what you want or need. If you want a blog hosted on a custom domain name rather than on wordpress.com, or if you want customization outside the limitations of what wordpress.com offers, I can install and host one for you, customize it as you like, and so on. Hope that all helps.