This is one part of a series of articles providing basic instructions for using WordPress. To start at the beginning, or view the full index of articles in this series, go to A Simple WordPress User Guide for Beginners.
Let’s Get Started
Orientation » There are two editing modes, Visual and HTML. Each have their own edit commands. We will be working within the “Visual” editing mode. See below at top right of the editing area where the word “Visual” is clear and “HTML” is faded out. This means you are in visual mode. If you are not, simply click on the work “Visual” to switch modes.
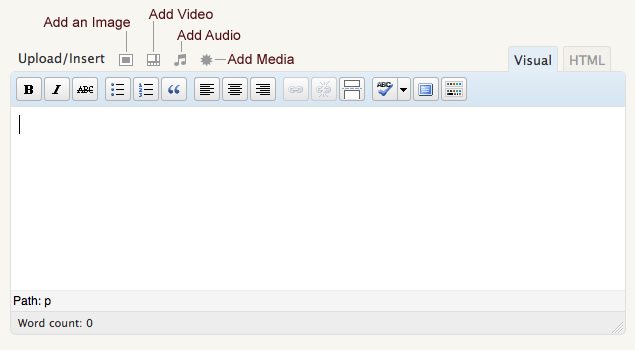
4 options » When writing or editing a Post or Page in WordPress, you will be viewing the following screen. At the top of the edit commands (bold, italic, etc.), there are 4 options to: Add an Images, Add Video, Add Audio, or Add Media. The first three are self-explanatory. Add Media allows you to add media other than the first three options, such as a pdf file. *Helpful Tip – When you are actually in your admin panel, moving your cursor over any of the edit command buttons will display text telling what that button does – so you don’t need to remember them.
Inserting » To add an image or other media, place your cursor where you want the image or other media to appear, and then click on one of the 4 “add media” options. *Helpful Tip – One common practice is to place images such that they will display at the top right or left of a paragraph. To accomplish this, place your cursor at the beginning of the paragraph, and when you are editing the characteristics of the media to be entered, you will be able to specify whether you want it aligned left or right. This will ensure it displays up top of the paragraph. Otherwise, centering your image or other media is also very common, as is often done in this article where the images are larger and for core reference rather than decoration.
Once you click on one of your “add media” option links, a pop-up will provide the following 4 choices, (see image below): From Computer, From URL, Gallery, and Media Library.

Options for Adding Images and Other Media
From Computer
You can upload an image from your computer by clicking on the button “Select Files”. This will allow you to locate the file on your computer and upload it. If for some technical reason there is a problem with this uploader functioning properly, you can click on the blue text link “Browser uploader” to use a different uploader that should then work. Once an image has been uploaded it is stored with your WordPress installation and will continue to be accessible and usable again via your “Gallery” and “Media Library” as explained below.
From URL
“From URL” allows you to enter in a web address, (i.e. https://designsbytierney.com/images/myimage.jpg), of where your desired image or other media file is located, if it is already available on the internet, and you know the address, and have permission to link to it.
Gallery
“Gallery” will display all of the media that has been uploaded to the current post or page. The Gallery is useful if you have lots of media uploaded to your WordPress installation, and want to locate more quickly and easily a specific piece of media that was once uploaded to a specific post or page. The core function of the Gallery is to upload a series of media to a specific post or page and use the built-in Gallery functions to easily and conveniently display that media in a viewing Gallery.
Fine details » This will include media that has uploaded to your current post or page, then deleted from that post or page, but not deleted from the Gallery or Media Library. (So if you delete an image and want to insert it again, you can find it in our gallery for that post or page.)
Your Gallery will not include media that was inserted into a post or page from your Media Library, having already been uploaded before from within another post or page. Once an image or other media is uploaded to a specific post or page, it will only be accessible from within the post or page’s Gallery that it waas first uploaded to. Otherwise you can always find any media file from anywhere within your Media Library.
Media Library
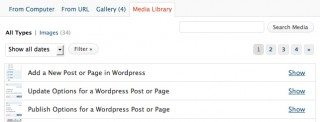 The Media Library stores all of the media that you have uploaded. Once it is uploaded, you can find it there, unless you delete it, which is explained below. If you select to find a media item in the library, you will be shown a list of content in the Media Library. Use the page navigation at top right of your window to scroll through and look for your image. Click on the “Show” link to the right of your media when you find it, and this will expand to show its details. From there can you can edit how you would like it to appear in your current post or page, and use the insert button to insert it.
Deleting Media
![]() Delete from a post or page. When you move your cursor over and then click on a piece of media in your edit panel, two icons will display at top left – one to edit the image, and the other to delete it. You delete a piece of media by clicking on the delete icon -(the red circle with the cross through it). *Helpful Tip – Often times, deleting and then re-inserting an image or media element is a better way to move it around, rather than to try and drag it around a page, as sometimes when you do that, you can end up with a result you did not intend or want, based on the associated code, or parts of code, that get dragged around with it.
Delete from a post or page. When you move your cursor over and then click on a piece of media in your edit panel, two icons will display at top left – one to edit the image, and the other to delete it. You delete a piece of media by clicking on the delete icon -(the red circle with the cross through it). *Helpful Tip – Often times, deleting and then re-inserting an image or media element is a better way to move it around, rather than to try and drag it around a page, as sometimes when you do that, you can end up with a result you did not intend or want, based on the associated code, or parts of code, that get dragged around with it.
Delete from WordPress. To delete a piece of media from your WordPress installation altogether, find that piece of media in the Gallery or Media Library, select to show its details, and use the Delete button at the bottom. Deleting it from either the Gallery or Media Library will delete it from both.
Editing Image Characteristics
Once you select an image to upload, WordPress will display a “crunching…” status bar as it uploads your image. Once this is done, it will display customization options for how you would like the image displayed. These customization options can also be accessed and modified in the Media Library. (Clicking on the edit icon once the image is inserted into a post or page will only give you limited options for editing the image characteristics.)

Edit Image
Edit Image is a new feature to WordPress 2.9. In the picture above, you can see a button near the top, under the bold word “Dimensions” that says “Edit Image”. This allows you to crop, rotate, flip and scale/ resize an image from within WordPress.
Title
This is the text that will display when you move your cursor over an image, if you so desire.
You are required to include a title when entering in your image details at this point. If you want it blank, you can remove the title after you have inserted the image in your post or page by then clicking on the image to display the edit image icon, clicking on that icon to view your image edit options for that use of the image, and removing the title in that edit box. Save your changes.
Alternate text
This is the text that will display in place of your image if your image, for whatever reason, does not. This is also what will be read by screen reader for someone who cannot see the image. Not required, but recommended for the reasons here, and also as it will help search engines learn more about your content.
Caption
If you would like a text caption to accompany your image. Where exactly it displays, if it displays, and how it is formatted depend on the pre-determined styling of your WordPress design. Most often it is displayed just under the image, left justified, centered, or right justified.
Description
If you choose to make your image a link to its “attachment page” by inserting its “Post URL” as its Link URL (see below), and you have an attachment page included with your website, then the description will show up with the image on a separate page when clicked on.
Link URL
If you want the image to act as a link to something or somewhere else, you can enter that full URL address here, (ie. https://designsbytierney.com/blog). One common link URL that might be used would be if you were, for example, writing a post about someone or something that had a website, and you wanted the image of that person or thing to link to their website. You would just enter that website URL here.
Otherwise, there are three buttons just below the text entry box that you can use to have WordPress automatically modify what your Link URL is.
- None – Removes any link that may be in the box by default, leaving it blank. The image will not act as a link. In many cases, this is most desirable, that is, if there is not specific reason to have the image act as a link, there is no reason to distract your website visitors with the thought of clicking it to see where it links to.
- File URL – Click on this button to insert the URL address of the image file itself, as a direct link to that image. This will simply display the image on a blank screen. This is useful if you insert the image at a reduced size and want users to be able to click on it to view it at its full size. This is also useful if you ever simply want to know the URL address of an image’s location on your server. For example, if you wanted to send an email to someone with a link to that image directly, you could copy that URL and paste it in your email message.
- Post URL – Your post URL displays your image or other media, along with any description (see above), on a separate “attachment page”, within the design frame of your website.
- File URL vs Post URL – The difference between the Post URL and the File URL is that the File URL link displays the image on its own, (no description) and displays it on a blank screen (no website header, footer, and other parts of your website). Using the Post URL is useful if you want to provide descriptive information and have it displayed within your website. Using the Post URL is not a good option if your intention is to have your image link to a much larger image view that is larger than your website design can contain, as this can have a variety of un-intended display results.
Alignment
Specify where you want the image to be displayed, in relation to where it was inserted in the body of your post or page – none, left, center, right.
(Repeated from the Helpful Tip above) – One common practice is to place images such that they will display at the top right or left of a paragraph. To accomplish this, place your cursor at the beginning of the paragraph, and when you are editing the characteristics of the media to be entered, you will be able to specify whether you want it aligned left or right. This will ensure it displays up top of the paragraph. Otherwise, centering your image or other media is also very common, as is often done in this article where the images are larger and for core reference rather than decoration.
Size
Your options are: Thumbnail, Medium, Large, Full Size. The size of the first three options are specified in your WordPress Admin panel under Settings » Media. (Be sure to know what you are doing if you want to change these settings, especially if you consider making them larger, as your website design may not contain images that are too large, and thumbnails may be used in other places on your website, such as on a biography page or in comments.) If your image is smaller than those settings for any of your options, then they will not be available (they will be faded out).
Insert into Post
Inserts the image into the post or page. You must click this button to do so, otherwise it will only be saved in your Gallery or Media Library.
Delete
Deletes the image.
Save all changes
Saves changes but does not insert into your post or page. You would use this button if you wanted to upload an image before using it. And if you ever re-open an image to edit it, from within your Gallery or Media Library, you may want to simply save the changes and not re-insert it.
Other Resources for Adding Media to WordPress
- Adding Media Using the Media Subpanel (Core Navigation on Left) – WP Codex – If you want to add Media in advance, not associated with a specific post or page.
That’s it. Use your images and media to spruce up your content. It puts life into the words, adds extra information, meaning, and beauty.